Mastering Blender Lighting: A Comprehensive Guide for Beginners and Intermediate Artists
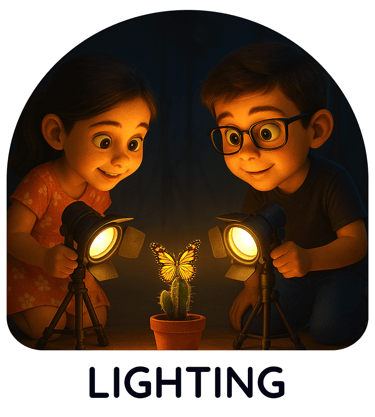
LIGHTING
Pranay Vaidya
4/22/20255 min read
Understanding the Basics of Lighting in Blender
Lighting is a fundamental aspect (Just like in life, it’s not what you see, but how it's lit that makes all the difference.) of 3D artistry in Blender, playing a pivotal role in determining the mood, depth, and realism of a scene. By manipulating light effectively, artists can guide the viewer's eye, enhance textures, and create a compelling narrative within their artwork. The selection and placement of various light sources directly influence how models are perceived, making it crucial for artists to grasp the basics of lighting within the Blender environment.
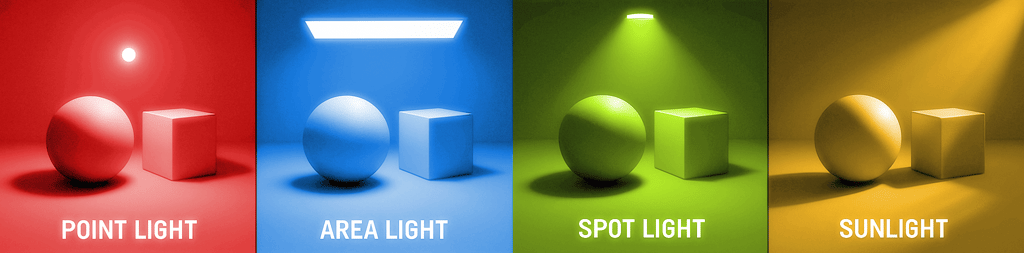
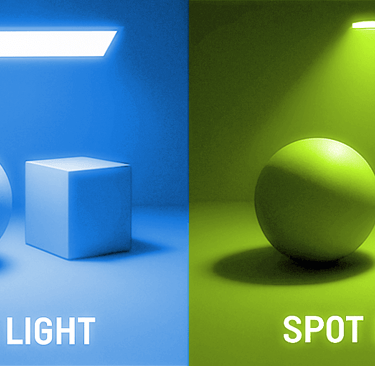
Blender offers several types of lights, each serving different purposes depending on the desired outcome. The Point light emits light uniformly in all directions from a single point. This type of light mimics traditional light bulbs and is ideal for creating soft shadows and local illumination. In contrast, the Sun light simulates sunlight and projects parallel rays across a scene. (A Sun lamp in Blender is like your mom’s morning motivation—bright, direct, and hard to ignore.) It is particularly effective for outdoor environments, where it casts distinct, dramatic shadows while enhancing the overall brightness of the scene.
Another essential light type is the Spot light, which focuses light in a specific direction and creates a cone-shaped beam. (A Spot light is that dramatic friend who enters every room like it’s a stage—and honestly, sometimes your scene needs that energy.) This feature is useful for emphasizing particular areas of a scene or creating dramatic effects. Finally, the Area light emits light from a defined surface area, allowing for soft, diffused shadows. (Area lights are like therapists—calm, soft, and they help everything around them feel a little more balanced.) It is widely used in interior scene lighting, providing depth and realism by mimicking natural light sources such as windows.
Understanding these types allows beginners and intermediate artists to experiment with their configuration and placement to achieve varied effects, thus improving their overall lighting techniques in Blender. Mastering the fundamentals of lighting not only enhances the aesthetics of a scene but also significantly elevates the viewer's emotional response, thereby creating a more immersive experience.
When and How to Utilize Different Lighting Types
In the realm of 3D modeling and rendering with Blender, understanding when and how to utilize various lighting types is crucial for achieving your desired artistic vision. Each light type serves a specific purpose and can dramatically influence the mood and perception of your scene. A well-thought-out lighting setup not only enhances visual appeal but also provides clarity and focus to the elements within your artwork.
One of the most commonly used light sources in Blender is the Sun lamp. This lighting type is optimal for simulating natural sunlight and is particularly effective for outdoor environments. When creating landscapes or scenes that require daylight illumination, the Sun lamp can be adjusted to mimic the direction and intensity of sunlight, allowing artists to create realistic shadows and highlights. It is most effective when the angle matches the time of day you wish to represent.
In contrast, the Spot lamp is ideal for creating dramatic lighting effects. This light type enables artists to focus light on specific areas while casting shadows, making it perfect for scenes requiring highlights and strong contrasts. Spot lights are often used in animations or dramatic presentations where emphasis on certain characters or objects is essential. The ability to adjust the cone angle and distance allows for versatile applications in storytelling.
For projects centered around architectural visualization, Area lights might be the best choice, as they provide soft, diffused illumination that can simulate natural light coming through windows. This set-up creates an inviting atmosphere, helping to eliminate harsh shadows that can detract from realism.
Ultimately, choosing the right light for your project depends on the requirements of your scene. Understanding the strengths and weaknesses of each light type will empower artists to create visually compelling renders, enhancing their overall work, whether they are engaged in game design, animation, or 3D visual storytelling.
Achieving Realism with Light: Techniques and Tweaks
Creating realistic lighting within Blender requires a nuanced understanding of several core concepts, including color temperature, shadow quality, and the effective use of light bounces. Each element plays a critical role in ensuring that your 3D scene projects a natural look and feel, mimicking real-world lighting conditions. For instance, adjusting the color temperature of your lights can dramatically affect the overall mood of your scene. Warmer tones often evoke a cozy atmosphere, while cooler tones lend themselves to a more clinical or industrial feel. (Choosing light color is like picking your mood for the day—warmth for cozy vibes, blue tones for when you're feeling ‘don't talk to me’ energy.) It is essential to select color temperatures that align with the environment you aim to recreate.
Moreover, the quality of shadows contributes significantly to realism as well. Soft shadows can be achieved by using area lights and increasing their size, while the placement of light sources is equally crucial. Shadows cast too harshly can break immersion, so consider the direction and intensity of light sources when configuring lighting in Blender. Additionally, utilizing light bounces can enhance the depth and dimension of your scene. (Light bounces, like good advice, often come from unexpected directions but still brighten the dark corners.) Employ the 'Indirect Lighting' feature in Blender to allow light to reflect off surfaces, realistically illuminating areas that would otherwise remain dark.
High Dynamic Range Images (HDRIs) serve as powerful tools for elevating realism in 3D environments. By integrating HDRIs as background images or light sources, artists can capture a full range of light intensity, resulting in more dynamic and convincing visuals. Another vital aspect is the combination of different light sources; mixing natural and artificial light can simulate complex real-world lighting scenarios effectively. Lastly, balancing light levels and adopting neutral settings can significantly improve the photorealistic quality of your work. By implementing these techniques and tweaks in Blender, you can master the art of lighting, enhancing your creations with a lifelike presence.
Setting Up Cinematic and Game-Ready Lighting
Creating compelling lighting setups in Blender that are suitable for both cinematic and game-ready visuals involves understanding and applying several key principles. One of the foundational techniques in cinematic lighting is the three-point lighting setup, which consists of the key light, fill light, and backlight. (Life’s kind of like a three-point setup—your main hustle, your support system, and that one thing that keeps you from blending into the background.) The key light is the primary light source and is usually the brightest, positioned at an angle to create depth. The fill light, typically softer, balances the shadows created by the key light, while the backlight adds separation between the subject and the background, enhancing dimensionality.
To set up this configuration in Blender, start by adding three light sources. Position the key light at an angle of approximately 45 degrees to your subject and slightly above its head level for a naturalistic effect. Adjust the intensity to ensure it serves as the dominant light. Next, place the fill light on the opposite side of the key light; set it to a lower intensity to prevent overpowering the scene. Finally, the backlight should be placed behind the subject, aiming towards it to create a rim effect that makes the subject pop. Utilize Blender’s customizable light properties to fine-tune these lights, ensuring they achieve the desired mood and atmosphere.
For game-ready lighting, the focus shifts toward performance while preserving quality. (Balancing render quality and speed is like trying to diet and party at the same time—you gotta pick your moments wisely.) It is essential to utilize low-noise settings, such as adjusting samples and light bounces. This approach maintains visual fidelity while optimizing render times, crucial for real-time applications. Implementing advanced techniques such as volumetric lighting can enhance atmosphere in both cinematic and game settings. Incorporating light linking allows for selective lighting control over individual elements in your scene. Post-processing effects, like bloom and glare, can further elevate the final render, adding a professional finish that appeals to audiences. With these techniques, you can create visually impactful projects suitable for any platform.
© Copyright 2024 Pranay Vaidya.
All rights reserved.